Australia, also called the Land Down Under, ranks as one of the best countries in factors, including education, healthcare, economic freedom, quality of life and lifestyle. The Nail Salon and Personal Waxing industry in Australia forms a significant part of the Australian lifestyle and has a market size of 1.2 billion AUD. As such, there are over 21,949 beauty and hair salons in Australia where millions visit every day. Thousands more spend endless hours browsing creative nail art designs, with the wish, desire and passion for creating flawless nails themselves. With multiple DIY courses, videos and blogs and nail art supplies online, anyone can learn to experiment themselves.
So, this article is a great place to start as it provides some insights, tricks and tips to create some inspired nail art designs at home.
1. A Colourful Splash Inspired by Modern Art
Splash nail art is one of the easiest and trendiest nail art designs that beginners can try. It gives every nail a unique pattern and a stunning finish. This design does not require sophisticated nail art supplies as one can achieve it using their favourite shades of nail paint, a stiff brush or a new toothbrush, cotton swabs, masking tape and a nail polish remover. They must first apply a coat of white nail polish on a clean nail to ensure that the colours stand out. Then dip the toothbrush into the nail polish colours, and using a pointer, stroke the bristles to spray them onto the nails. And those who want to add some shapes into the mix can add rhinestones and hearts. Then, use the nail polish remover and a cotton swab to clean up the surrounding areas. Finally, use a clear coating to seal the art.
2. Lines and Geometrical Designs
Fun geometric designs add sophistication to the nail art designs and are an upgrade to the dual-tone nail art method. They are effortless to make and only require different shades of nail polish (to try out combinations), masking tape or scotch tape, nail polish remover and cotton swabs.
So, begin applying two coats of a base colour of any choice, like chocolate or pastel colours. Cut out a strip of the scotch or masking tape and place it at an angle, a little below the centre of the nail. Use another strip to create the other side of the line or a triangle. Press along the edges to prevent them from opening or falling off. Apply a coat of contrasting nail polish like gold, neon, black or other colours. After getting the required design, remove the tape and repeat the process in another part of the nail. Finish with a layer of clear polish and clean the surrounding areas.
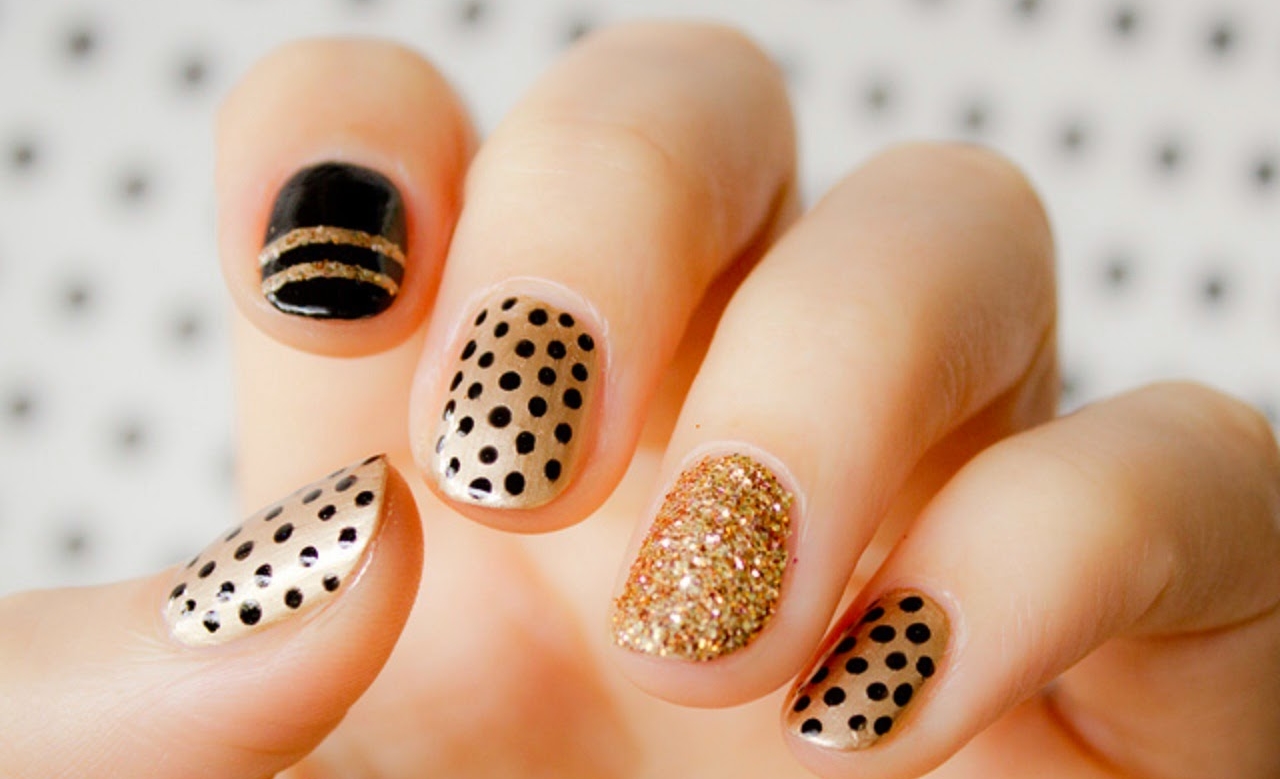
3. Add Some Sugar, Glitter and Shine in the Mix
Sparkly glitter nail designs are the perfect choice for a part. They make the nails pop up and stand out in the crowd. So, those who want to compliment the romantic night sky on a date can try the intergalactic nails to add pzazz. One can achieve this as they can buy nail art supplies online like a base black or dark nail polish, shades of metallic coloured nail paint, or glitter top-coat nail polish, scotch tape, rectangular sponges and a toothpick. Paint all the nails with the base, dark coating. They can use scotch tape to create different designs and fill the space with a complimentary colour. Use the sponge to apply a layer of metallic nail polish and dab along the edges, and allow it to dry. For the final finishing, apply a layer of the shiny glitter polish to bring out the shine and apply a clear polish to keep the art together.